Category

Photography

Dslr camera setting for beginner photographer

By | Photography | No Comments

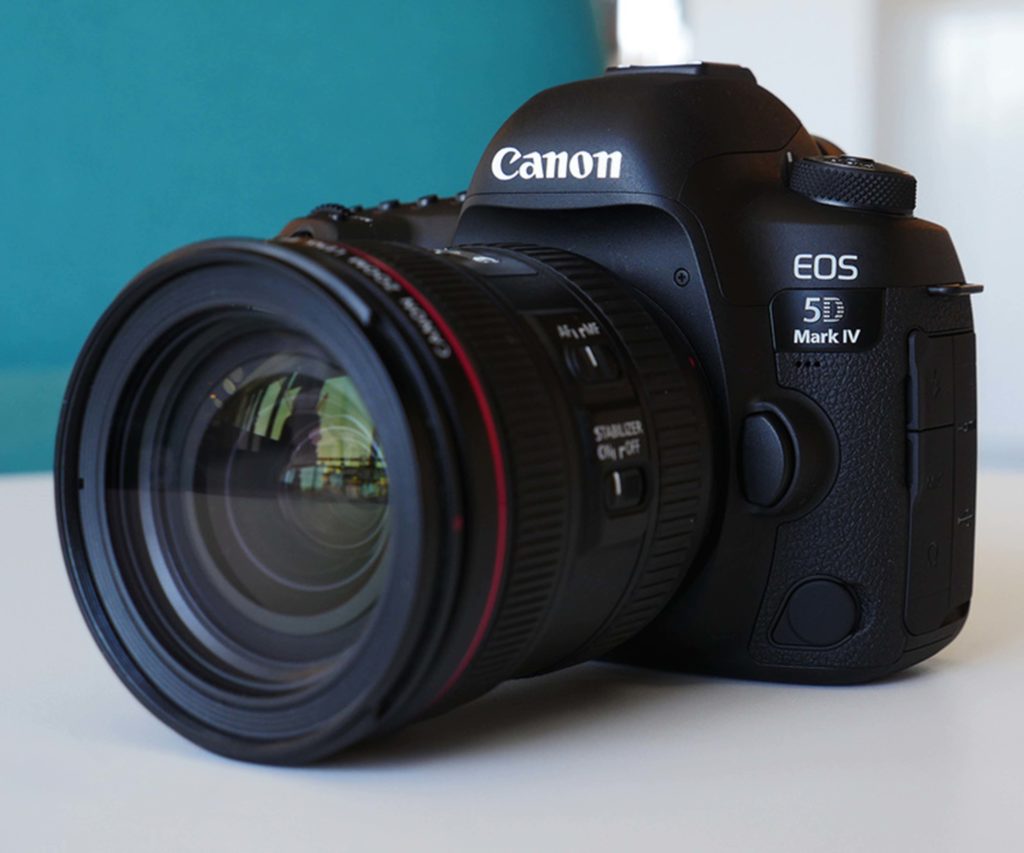
In this post i am going to tell you the setting of dslr camera or a mirror less camera you have taken recently.This will help you taking sharper and clear image quality.This will be the basic setting for you camera.Now days every month or so there is a new launch in dslr camera.I myself try to use every camera which comes in market for at least 10 days so that i can give you a better review but its not possible so i assume that people who have bought a dslr camera recently and don’t know how to setup you camera so today i am going to tell you some basic setting for beginner.These are the setting which i always put in every new camera i go through so that its ready to use and i could use it in my own way.

  • APERTURE & SHUTTER PRIORITY MODE

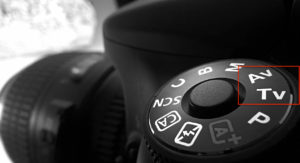
Starting with the most basic thing which i always start with a camera is “camera mode”I know its very confusing for the beginners to understand modes of camera. So just to give you an over view if you are a Beginner you can not use manual mode easily so what i recommend you is to shoot in Aperture or shutter mode. In canon you have it with AV &TV option, in Nikon has a different term so does Sony, Panasonic cameras but the basic feature is same .In aperture priority you just have to put aperture number camera auto sets ISO & shutter speed similar in shutter priority you just have to put shutter speed you want rest the camera with set up by itself (ISO & aperture). In this you have benefit that you don’t have to struggle so much for you camera setting camera does half work by it self. You keep shooting camera will do the setting by its own.So i suggest you to shoot in aperture priority mode & trust me  this will help you as before you might be stuck in focus setting & all .You could now be able to focus on your shooting with resulting in better images.

  • SHOOT IN RAW

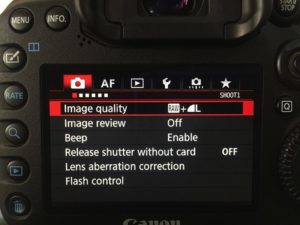
When every i click pictures i try to shoot them in raw format +jpg .The benefit behind this is that when ever if i have to edit the picture i could use the raw format of the picture because in raw format you have much more detail rather in jpg and when you are editing the picture you can play with details and many more things which is not possible with jpg format. I use jpg mode for random selection and just have the view of picture and raw format images to edit. If you are willing to do more in photography and do better editing you should start following this step.

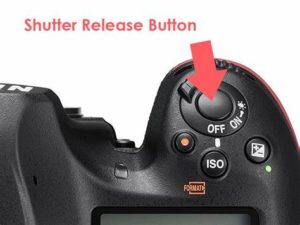
  • BACK BUTTON FOCUSING

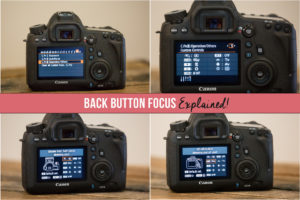
Normally when you press the shutter button first you have to set focus while pressing half and then when we focus it goes down full and picture is taken.So what i do is using back button focus technique i assign the button for focus. So now the shutter release button will just take picture you don’t have to focus again and again the back button will be the focus button now the benefit are like when u are shooting a portrait  you and your subject distance is fixed you focused your subject once from you back button after that you can take multiple pictures without loosing focus unless the distance is fixed. This is one of the uses of back button focusing. I myself have been using this for 3 to 4 years and i still put up this setting in every camera i try.

  • WHITE BALANCE

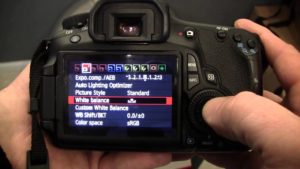
When you click a picture at times its more at yellow side or blue. If i tell you in brief temperature of the image range between yellow and blue tones. Now if you shoot jpg format of image you have to put down the white balance effect you want. So as i told you before the setting of raw format because when you are shooting in raw best thing is you set the white balance in auto and when you have taken the shot you can rearrange it while editing the final picture (light room or Photoshop). You can also preview all the white balance effect available in you camera in Adobe light room. This is the best feature if you take pictures in raw format of images. I allways keep my camera white balance in auto and when ever i have to makes any changes i do it while editing it in adobe light room.

  • SHUTTER SPEED

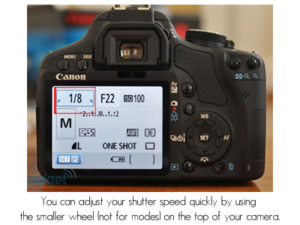
Coming on to the next point this is the biggest query i get to hear is when you click a picture it have a shake and blur effect that means your shutter speed is at lower side. In most of the situation what i do is you get a option in camera where you can fix the shutter speed it wont go beyond that. For example you are using 50mm lens so the shutter speed fixed should be somewhere 1/50 .If you go beyond that there are chances that you see shake in picture. So go to setting at set your shutter speed in a limit so that it does not goes beyond that and you have a sharp and clear image

  • FOCUSING

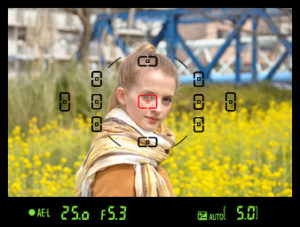
Usually  when you buy a new camera and you try to focus you see boxes allover the subject and it focuses in any point and takes a picture what i do is i make a selection of single servo focus.In this option you can manual drag the box to to where you want it to be focused. For example if  i am shooting a model i will drag the box towards model eyes or nose this will not let u have out of focus pictures and camera wont focus any unwanted areas. So this is one of the most important setting if you want properly focused pictures.

  • METERING

This setting is mostly ignored by many people i am talking about metering modes. at times when you are shooting and you feel you have the correct setting but you end up having over or under exposed picture.That can mean that the metering setting in you camera is not set properly. usually  you have three metering modes available matrix/center weight/spot metering. Now in matrix what happens it takes an average exposure of the frame in center weight the exposure is also consumed from the center of the frame only 25 to 3o percentage of light it wont detect elsewhere for light.Spot metering is like when u taking a picture of a model you click the picture of her face and spot metering in on only the selecting are will have light rest elsewhere light is there the camera wont detect it. Spot metering will only take the exposure of the spot area and will give you the setting for it. So depending on the situation now you can take accurate exposure pictures when you are working of camera auto or semi auto modes.


Best camera for Indian wedding

By | Photography | No Comments

Before I informed you guys related wedding videography now we are going to talk about Indian wedding photography.Wedding photographer demands the photographer must know how to interact with people at different situation. photographer should be very focused in what shot he wants and should be able to use proper technique to capture picture .Indian wedding as you all might know is full or ceremonies. To cover all the ceremony a  photographer needs something which could be handle easily no complicated handling.There are many camera in my head right now but there is only few i would share with u guys which will make your job easy in capturing multiple moments in one particular shot.I have made a list of top five cameras which will be very handy in Indian wedding.

Canon EOS 5D Mark IV


Fuji Film XT3 Mirrorless camera


Sony a7R iii

Nikon D810


Nikon D750


Lighting Tips For Wedding Ceremony

By | Photography | No Comments

All things considered, receptions can turn out to be the most difficult piece of a wedding with the presence of such huge numbers of uncontrolled factors. You are stuck in a low light scene, compelled to work with the DJ’s light setup, and you have no choice but to adapt. Here are 10 tips to help you to conquer any conceivable lighting obstacles that get in the way of delivering exceptional images to your customers:

1. Evaluate The Situation and Place Your Lights

Stroll into the scene and address where the issue zones are; you are setting yourself up for success just by getting ready for what’s to come. Most lighting circumstances cause photograpers worry because of absence of readiness for the scene they’re shooting in.

Place flashes in the furthest corners of the room, where you know you will require a knock of light or in territories that require a backdrop illumination to haul subjects out from dim backgrounds. Raise them to around 6 feet to abstain from having shadows thrown from any of the situated visitors, and zoom them the distance in to keep any light spill.

2. Match The Color Of Light

There is no reason for including light if it isn’t the right kind. Match your on-camera flash and off-camera flash to the current light in the room. Contingent upon the temperature of the surrounding light (Tungsten, Daylight etc.), dial in a Custom Color Temperature setting in-camera to offset the light in your scene.

3. Light Modifiers

Since your essential extra light is in all probability going to be your on-camera flash, you should need to consider utilizing a strategy for diffusion so you won’t have solid features regarding your matters. Then again, you’ve set your off-camera flashes in the most distant corners of the room on low power as to maintain a strategic distance from any light spill and give you light direction. You have the alternative of gridding your off-camera flashes to make a more guided and directional light source.

4. Dial In Your Camera Settings

This step is left to preference since it will shift contingent upon your accessible surrounding light and the intensity of your camera. In low light circumstances, we shoot at around 1/200th of a second, at anywhere from ISO 800-3200. Your aperture is reliant on which lens you are utilizing yet remember you need a wider aperture to let in more light.

5. Bounce Your On-Camera-Flash Off Of Ceilings And Walls

Most photographers make the assumption that they are getting the most out of their on-camera flash by bouncing it off the ceiling. In most venues where there are low white ceilings this proves true, you may end up at a setting with dull wood or painted ceilings, in which case you have to make utilization of your environment and discover walls or items to bounce to your light off of.


Traditional Vs Candid Photography

By | Photography | No Comments

Wedding in India or any place is a unique affair. People want to memorize their extraordinary day. Wedding photography is the most ideal approach to catch the most brilliant snapshot of a couples’ life, their big day. Nowadays there is a trend for candid wedding photography which is catching fast. While this is a new trend, there are yet numerous takers of traditional wedding photography also.

Expect the unexpected: Candid is always spontaneous

Indian candid photography is a great blend of the old and new as it covers an exceptionally traditional wedding in new and diverse hue. It captures individuals when they don’t know about their photo being taken. Hence, the name candid. The photos are taken suddenly without organizing a scene. Consequently it is natural and gets a feeling of realism. The photographer moves around the wedding area and catches people unprepared as they approach the wedding rituals. It has turned out to be extremely prominent in recent times in spite of candid photography cost being higher than that of traditional photography.

Traditional is still a trend

In a difference to candid photography, a traditional photography would include taking down pictures of the people who would be aware that a picture is being clicked. This sort of photography is more informal in its approach.

Traditional photography enables the photographer to make the ideal situation to take a photo where everybody is giving their best shot. It additionally implies that the people who have to be in the picture can dress up likewise and pose which suits them more.

Candid V/S Traditional Photography: The Differences

While traditional photography guarantees that occasions are caught as they were proposed to, the magnificence of candid wedding photography lies in the natural reaction of people. It catches individuals in their most genuine feelings and draws out the sentiments of that moment through a photo.

In the traditional photography, if the photo is attempting to capture the newlywed couple, then they will be visible crystal clear and will be at the center of the photo usually. This is not the same as candid photography where the photographer can choose to pick one of a kind plot for capturing the couple. He may focus around a scene through a new position and utilize light distinctively to give a fresh perspective to the photo being more creative.

There is a distinction in the approach of a candid photographer and a traditional photographer. For instance, a candid photography will utilize light and compose the portrait of a person in a more informal tone than a traditional one. The last impact of the photo is additionally dependent on post-processing of the images and the photographers skill.

The difference between the two forms is in the way both observe a scene to be photographed and how they want to frame a subject in the picture and compose it. The difference could likewise be in the environment in which they prefer taking pictures and the use of light in them. With all the hype and excitement around the candid version of Indian wedding photography, it doesn’t imply that the traditional form is outdated. There are numerous takers of the traditional wedding photographs in India as it has been an acknowledged and traditional way of taking wedding pictures for decades.

In the two cases, the outcomes are quite different however relying upon the photographers ability, both styles of photography can give stunning outcomes. Some moments are best captured spontaneously while certain parts of the wedding benefit from traditional photography.